For most photographers before they even press that shutter button, they have already pictured the type of shot in their heads. What exactly do I mean by that?
Well for example, a sports photographer may use a panning technique to shoot a moving sports car so that the background is out of focus to convey a dynamic shot of motion. Or maybe you are a portrait photographer and you want your subject set against a wonderful bokeh in the background.
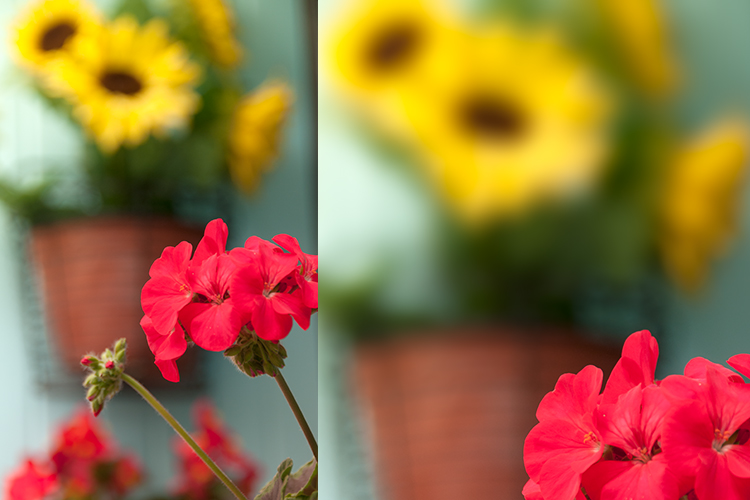
Shallow DOF on the photo to the left. A Field Blur filter using Photoshop was added to create a greater depth of field look to the photo on the right.
In-camera blur versus done in Photoshop
All these techniques can be done in-camera. But sometimes due to time, technical constraints, or other factors, getting that desired shot in-camera isn’t always possible.
In this article, I will take a look at the Blur filters in Photoshop and demonstrate how useful these effects can be when applied in post-production. Whether you want to create a motion blur effect or simply blur part of the image to create a shallow-depth-of-field look.
When Photoshop CS6 was released Adobe added three new filters: Field Blur, Iris Blur, and Tilt-Shift. This brought the tally up to 14 different types of Blur effects in Photoshop. These new blur features were impressive.
Blur filters in Photoshop
First, let’s take a look at few and where you access them in Photoshop. I’m using Photoshop CS6. Go up to the Menu Bar > Filter and select Blur. I’m not going to describe all of them. Instead, I will concentrate on the few that I use the most but feel free to experiment with the others.

Where the different Blur filters are located in Adobe Photoshop.
Some of the filters I’ve never used let alone tried, such as Blur and Blur More. Here are some blur filters which include my personal favorites:
- Gaussian Blur
- Field Blur
- Radial Blur
- Motion Blur
- Average Blur
- Lens Blur
If you take a look at the following images, you can see the subtle, and not so subtle differences, each blur filter has on the same image, which are white lines on a black background.
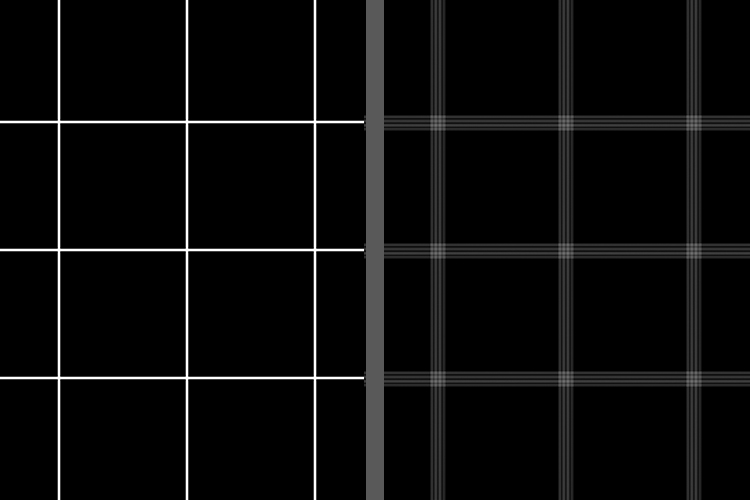
Normal whites lines on a black background – no blur effect. A Shape Blur filter was applied to the same image on the left.
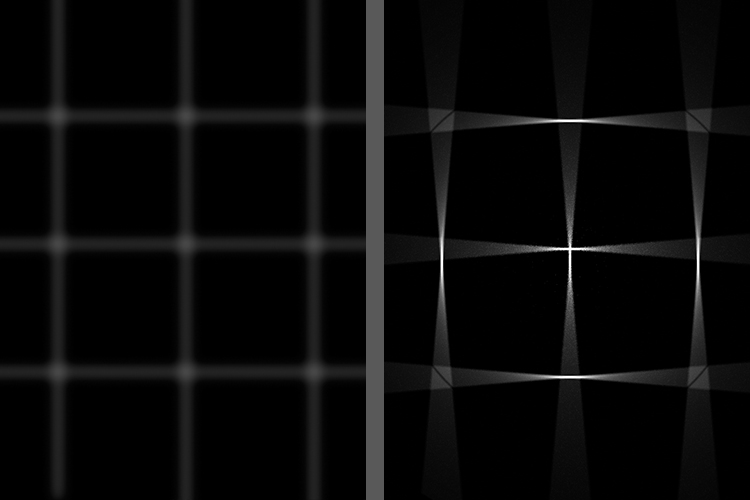
Gaussian Blur was applied to the image on the left and Radial Blur was applied to the image on the right.
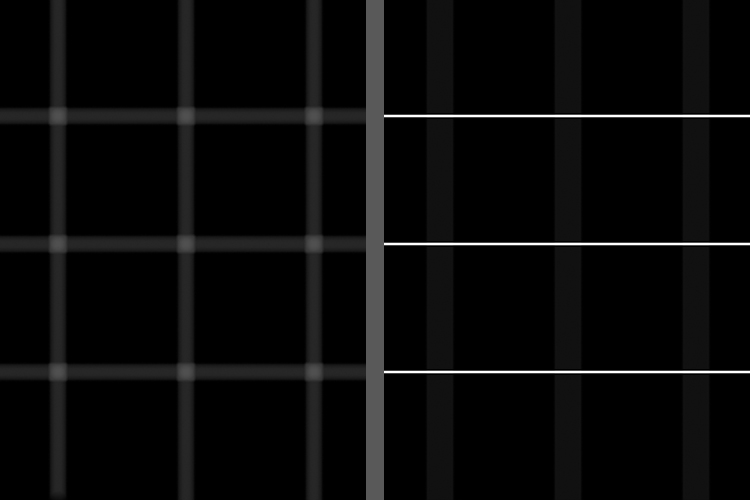
A Lens Blur was applied to the image on the left and a Motion Blur was applied to the image on the right.
Gaussian Blur
I use Gaussian Blur the most out of all of the blur filters. It is my general workhorse for blurring parts of an image and for softening the edges of a layer mask. It can also reduce noise in an image.
Field Blur
Field Blur works great when you want to focus on an area of your photo, such as the foreground or background. You apply a pin on the part of the image where you want the focus left as it is. Then reduce the Radius to 0px, which can be done either by using the slider in the top right part of the menu or by dragging the white bar around the pin until blurring disappears. Place another pin or pins on the image where you want to blur the focus. The default setting is 15px Radius.
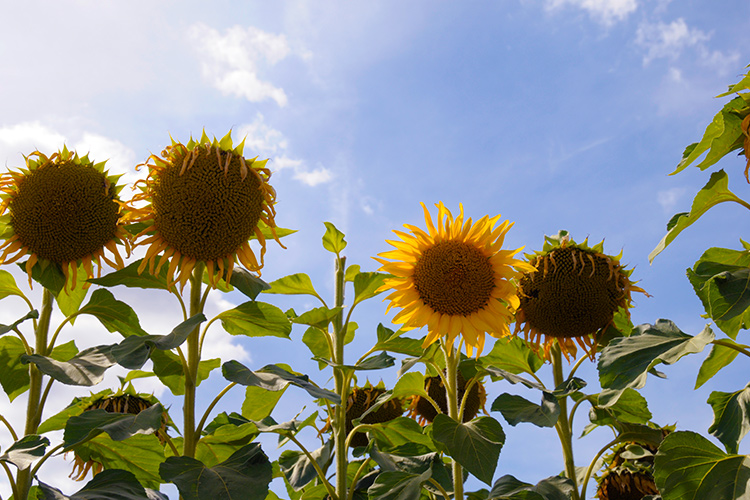
Sunflowers in France – one is smiling while the others are wilting due to the intense heat.

Applying the pins on the image where I want the focus to remain, and others where I want it blurry.

I applied the Field Blur to blur out the poor wilting sunflowers so that the focus was on the smiling sunflower.
Note: If you have version Photoshop CS6 13.1 or Photoshop CC, you can apply these blur filters to Smart Objects. That’s a big plus.
What I found particularly impressive when either of these three blur tools are accessed is the separate panel for creating Bokeh. Read this dPS article if you want to know how to create a Bokeh effect in Photoshop.
Radial Blur
Pick up any magazine or newspaper where you see photos of cars being advertised. If you look closely, you will see some images of cars where the motion effects were applied in post-production. Reflections, the wheels of the car, and the background are the usual tell-tale areas.

An animated Gif to illustrate the Radial and Motion Blur effects applied to the wheels and parts of the car and the background.
Let’s take for example, the wheels of a car. A Radial Blur could be used here to create the effect of the wheels spinning around.
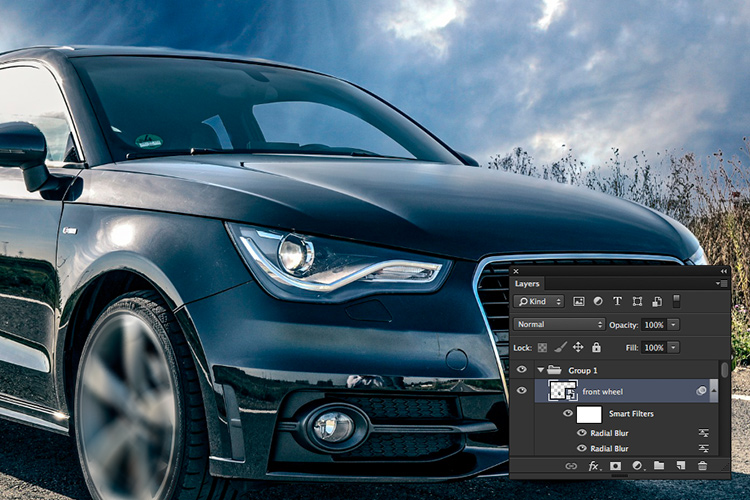
Radial Blur applied twice to the front rim part of the wheel.
In the example above, I first selected the wheel rim and part of the tire using the pen tool (See Note below). The pen tool saves the selection and I can edit it later if needed. This selection was placed on its own layer and converted it to a Smart Object. I applied two Radial blurs. For the first method, I used Spin; Quality Best with a 8px blur. I then applied another Radial blur using the Zoom method; Quality Best at 6px blur.
Motion Blur
For the background and other parts of the car, I used the Motion Blur effect. I duplicated the image and converted it to a Smart Object. The car was isolated with the pen tool and I applied a layer mask so that when the motion blur is applied, it affects the background only and not the car. You will notice a little ghosting around the rear of the car.

Radial Blur was applied to the wheels. Motion Blur was applied to the side panel, rear side window, and to the background.
Ideally, you would also cut out the car from the duplicated image and clone the area back in with the surrounding sky, trees, and road.
Disclaimer: I’m in no way inferring here in this article that to convey motion to a static shot of a car that all you need to do is apply Radial and Motion blur effects. Far from it. I fully appreciate that more techniques are involved, along with time, skill, and effort, to pull off a professional retouching job.
Note: I feel the Spin Blur Filter in Photoshop CC is definitely a much improved version of the Radial Blur. You add a pin over the part of your image. Click and drag the ellipse’s borders to resize it, or you can also click and drag the handles to reshape and rotate it. It’s much faster and intuitive to use. You have more control and it works on Smart Objects. The effect is also more realistic in my opinion.
Average Blur
This is a filter I don’t use that often but I wanted to demonstrate how to use it to remove color casts on your photos.
With your image already opened, duplicate the layer. Go up to Filter > Blur > Average. It will turn the image to a solid color by producing an average of all colors in the image. Add a Levels Adjustment layer. Click on the middle eyedropper tool and click anywhere on the solid color layer. This samples a gray point in your image. Turn off the visibility of this layer and you will see the difference, the color cast has been removed. It’s not perfect though, and you may find that further editing is required.
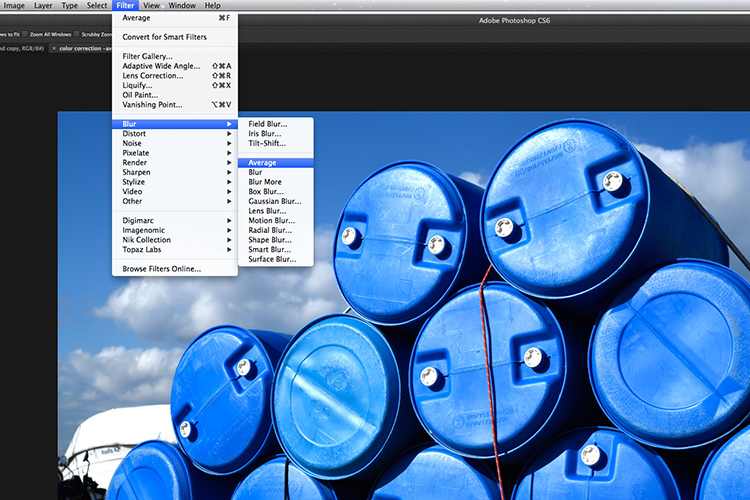
How to apply the Average Blur in Photoshop.
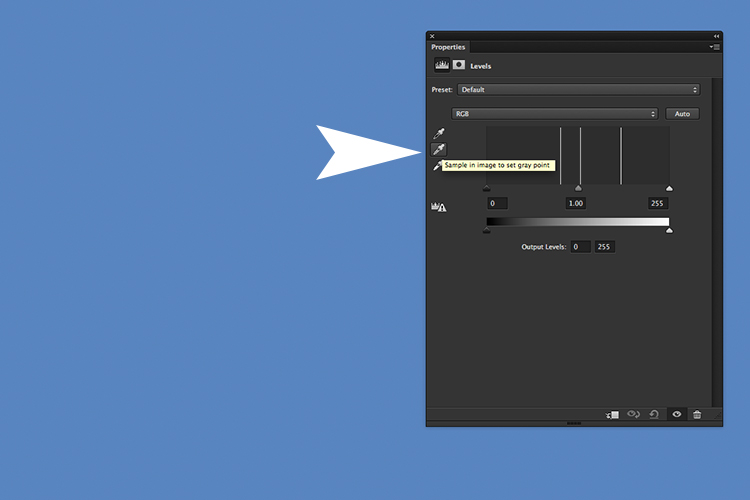
A solid average colour is calculated, which is blue. Add a Level Adjustment Layer and click on the middle eyedropper tool.
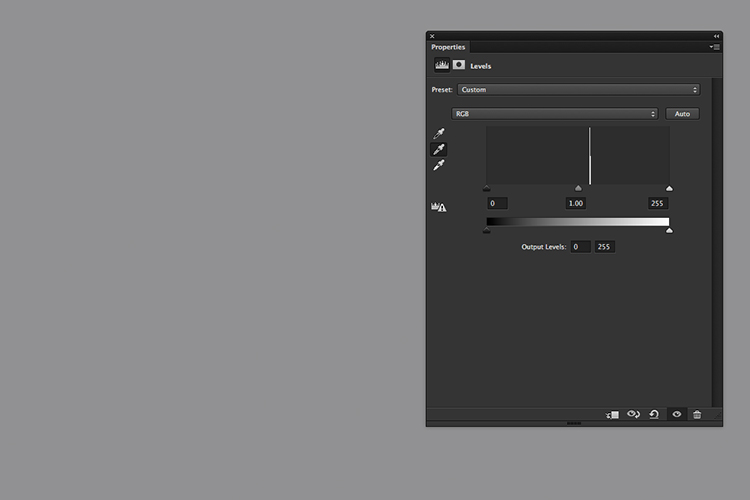
By selecting the gray eyedropper tool and clicking on the image, the blue colour changes to grey.

The colour cast has been removed.
Lens Blur
The Lens Blur filter is probably my favorite of all of them if I had to choose one. It does a fantastic job of replicating the shallow DOF (Depth-of-Field) look normally achieved in-camera. While Field Blur also does a great job of this, I still prefer the Lens Blur method as you can import a depth map. That is an alpha channel which stores the selection as an editable grayscale mask in the Channels panel.
An example
In this image of the rhino taken at Dublin Zoo, I was too far away and I didn’t have a telephoto lens with me to get a nice shallow depth of field to blur out the background.

A rhino taken at Dublin Zoo.
So in Photoshop, I selected the rhino using the Quick Selection and Refine Edge tools. I saved this selection and named it. The selection or mask is now permanently stored as an alpha channel. To access it, I opened up the Channels panel and selected the alpha channel called rhino. By holding down on the Cmd/Ctrl key and pressing the letter I, it inverts the mask. The rhino is now black. Remember black conceals, white reveals on masks. Next, I clicked on the RGB layer to go back to the Layers panel.
I now need a layer mask for the foreground as I only want the background to appear blurred. Follow these steps to do the same:
Create a new layer and click on the Gradient Tool. Go up to the Gradient Editor and make sure you choose the preset Foreground to Background. Start near the bottom of the image while holding down the Shift key and drag upwards. It may take a few tries but you want a nice transition from black to white, similar to the image below.
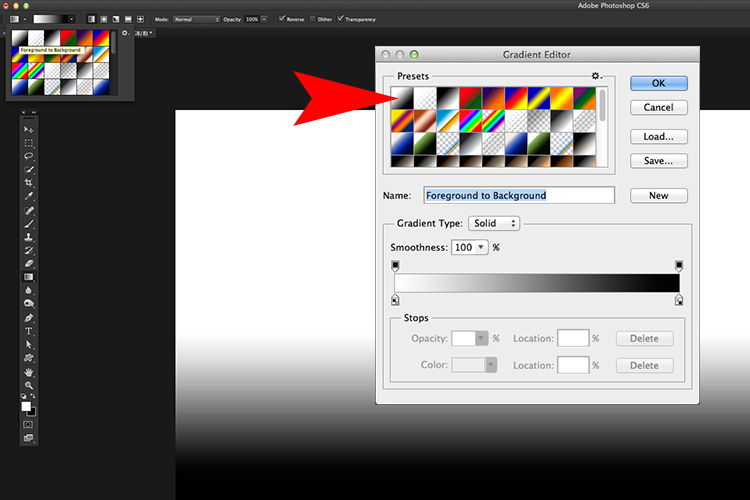
Open up the Gradient Editor and set the preset to Foreground-Background.
Open up your Channels panel again and duplicate any of the red, green, or blue channels and name this gradient. You now have two separate channel layers; one with the rhino and the other with the gradient for the foreground.
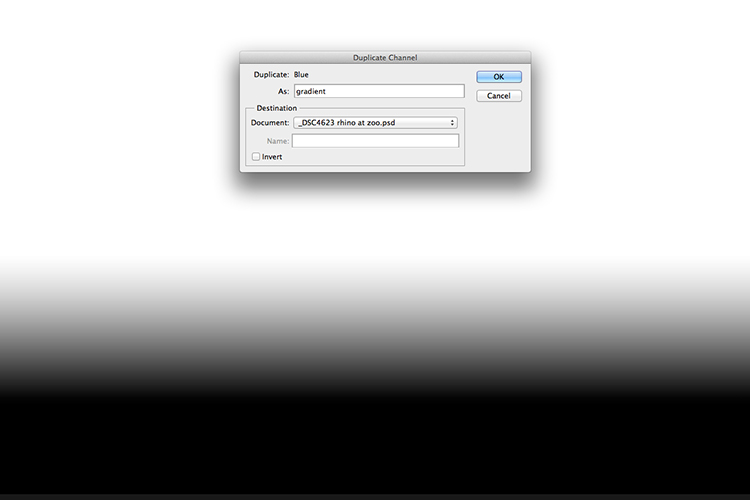
Duplicating the gradient channel to create one alpha channel.
Bear with me for the next few steps!
In order to create just one alpha channel to load as a depth map for the Lens Blur filter, we need to copy the rhino selection onto the gradient layer. So duplicate the gradient channel by right clicking on the layer or dragging the layer to the bottom of the Layers panel to the icon “Create new channel”. Name it rhino mask in this instance.
Hold down the Cmd/Ctrl key and click on the rhino layer. You will see the marching ants around the rhino and the border. Go up to the Menu Bar > Select > Inverse. Now the marching ants are just around the shape of the rhino. Go back up to the Menu Bar > Edit > Fill with Black. Click on the RGB layer and go back to the Layers panel.
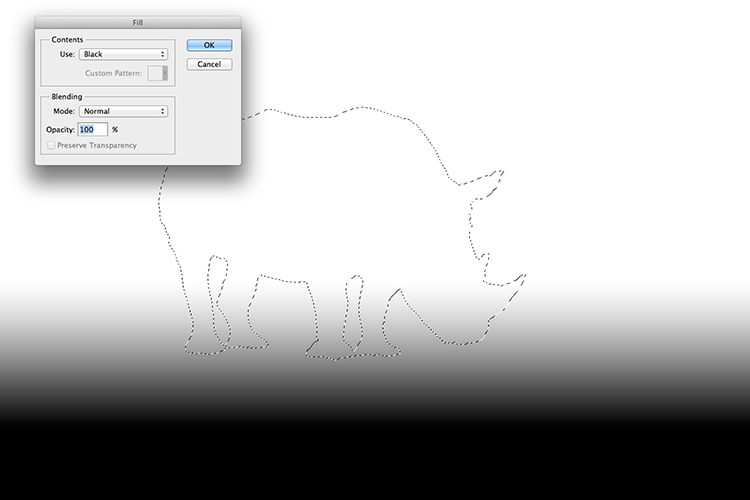
After inverting the selection of the rhino, you can now fill it with Black.
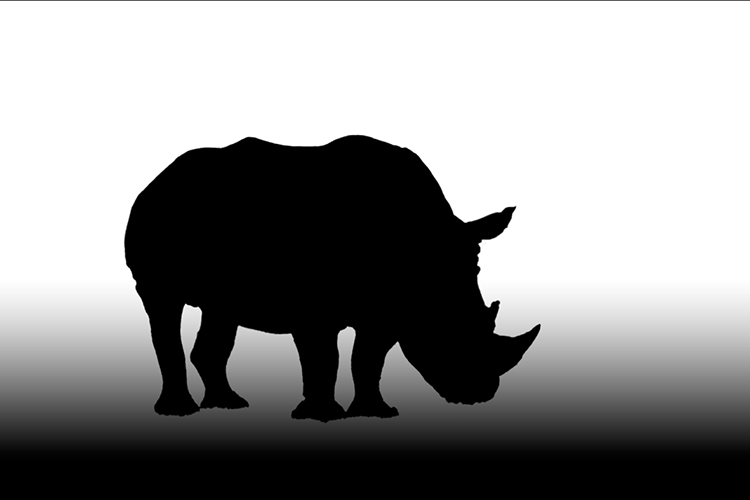
Now we have the rhino mask and the foreground mask on the one channel ready for the Lens Blur filter as a depth map.
Now we are ready to load this channel as a depth map into the Lens Blur filter. Duplicate the layer, or if you have a new version of Photoshop convert it to a Smart Object.
A separate dialog box appears and the image will initially be blurry. Go to where it says Source and click on None. A drop down menu appears and you can select the channel you have just created, in this case “rhino mask”. Adjust the radius value and click the Ok button.
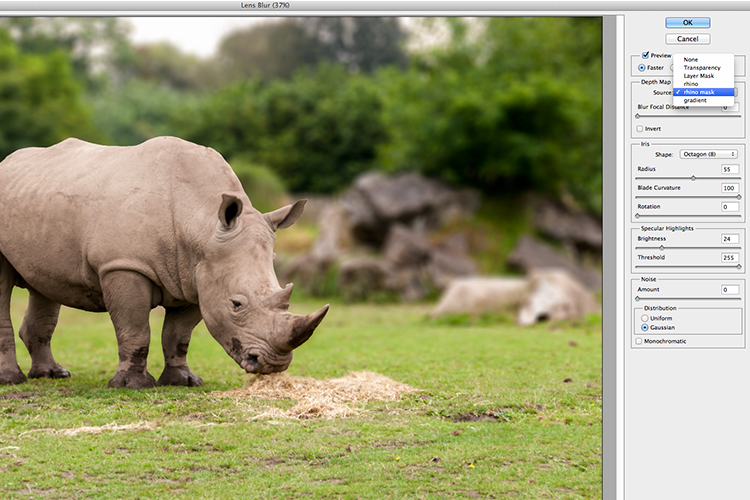
Selecting the channel rhino mask in the Lens Blur filter
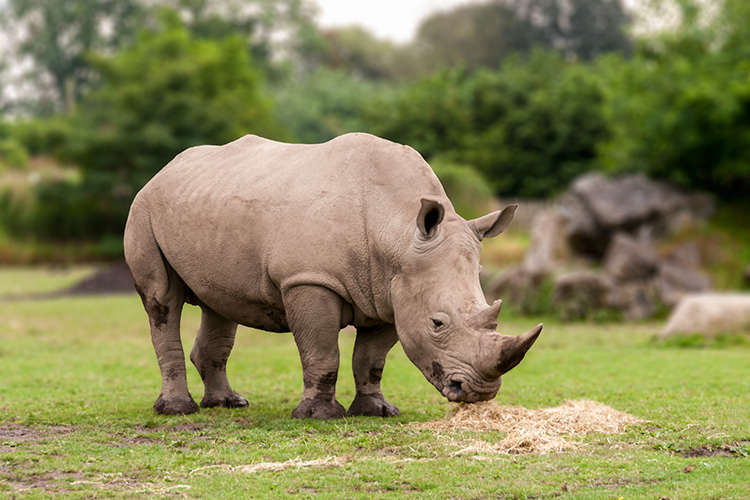
The depth map has been applied and a shallow depth of field has been created.
Conclusion
I hope this article was helpful and your eyes aren’t too blurry from reading it.
Do you use Blur filters in Photoshop? What are your favorite ones? Please share your comments below.
The post Tips for Using the Blur Filters in Photoshop by Sarah Hipwell appeared first on Digital Photography School.