As photographers, we often swear by the mantra that a picture speaks a thousand words. Yet there are some instances when we just wish we could add a word or two to help facilitate the understanding of the image, or carry the thought process forward even beyond viewing the image. The good news is that this is fairly easy to do using most editing software on the market today.
In this article we’ll go over the basics of how to add text to an image using Photoshop.

The Type Tool
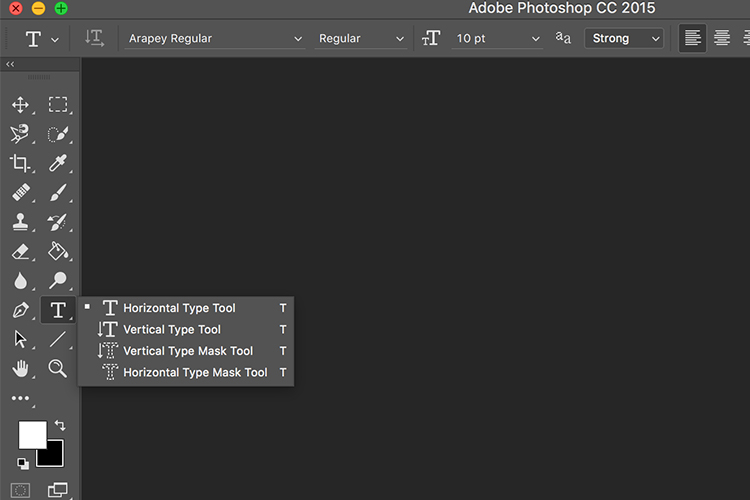
Photoshop’s Type Tool is an easy to use yet powerful mechanism with which you can add text to an image. The Type Tool is found in the Tools panel, normally located along the left side of the screen. It’s the icon that is the capital letter T. You can also select the Type Tool by pressing the letter T on your keyboard. The default chosen is the Horizontal type tool, but you also have the option of selecting the Vertical type tool (where text entered is displayed in vertical orientation, going down instead of to the right – just click and hold your mouse on the Type tool on the panel to access the other options).
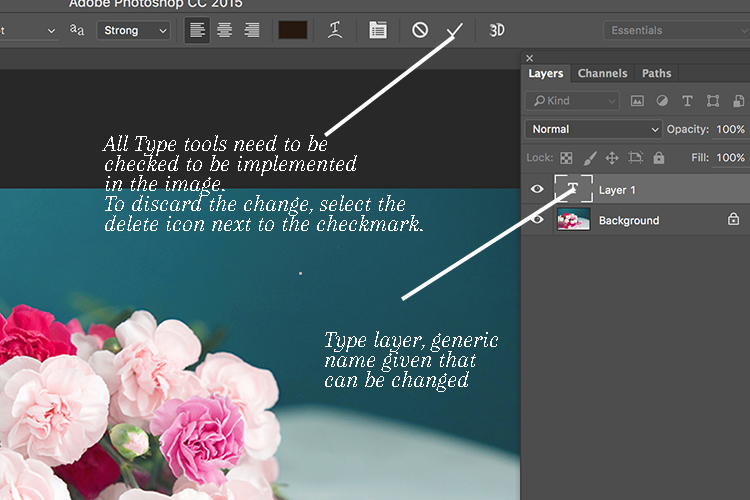
When you choose the Type Tool, Photoshop automatically creates a new layer (called Type Layer) over the original background image. This is very helpful should you make a mistake and want to delete the layer to start over, or if you want to make edits after the fact. Initially the layer has a generic name “Layer 1” but once you start entering the text, the layer name changes to the text you have entered. However, this can be confusing, especially if you are entering in a lot of text in the type layer. I recommend changing the name of the Layer to something more appropriate and meaningful like Title Text or Quote Text, etc.
Choosing a Font
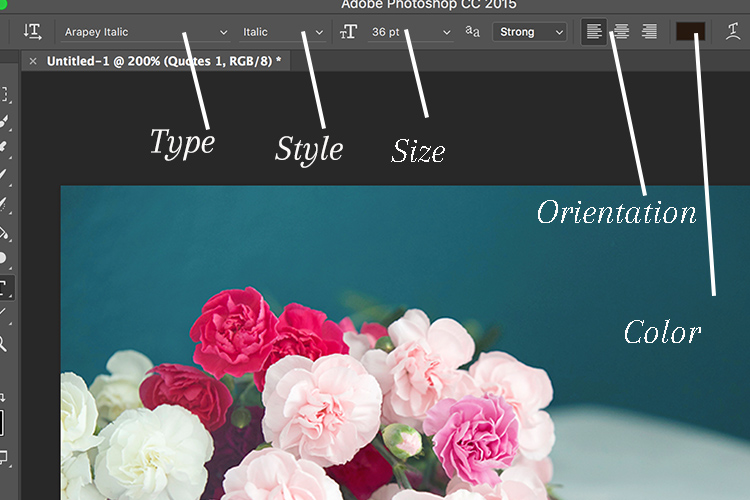
As soon as you select the Type Tool, the Options Bar along the top of the screen updates to show the options related to it, including options for choosing a font, a font style and the size among others. Front left to right (as shown in the image below) you can choose font type, font style, font size, alignment, and color. The type indicates the font you want to use. Clicking on the dropdown arrow shows a list of all the possible fonts available for use. The exact fonts you’ll see in your list will depend on which fonts are currently installed on your computer. Next up is the style. In this example, I have used italic style for the image below. Following that is the size, alignment, and color. Selecting the color opens up the color picker tool where you can either choose the color from the pallet, or enter in the HEX value of the color you want for the text.
Adding Type to the Image
The power of the type tool in Photoshop lies in the ability to add different types of text to a document. The first option is Point type (also known as character type), and the second is Area type (also known as paragraph type). The difference is that point type is mainly used for adding small amounts of text to a document (a few words, a title, etc.) while area type is used for adding larger amounts of text (think a quote or paragraph) inside a selected area. The Point type is the basic type tool. When the type tool is selected the default is a line of text that will keep extending as long as you keep writing text in the type box (that is Point type).
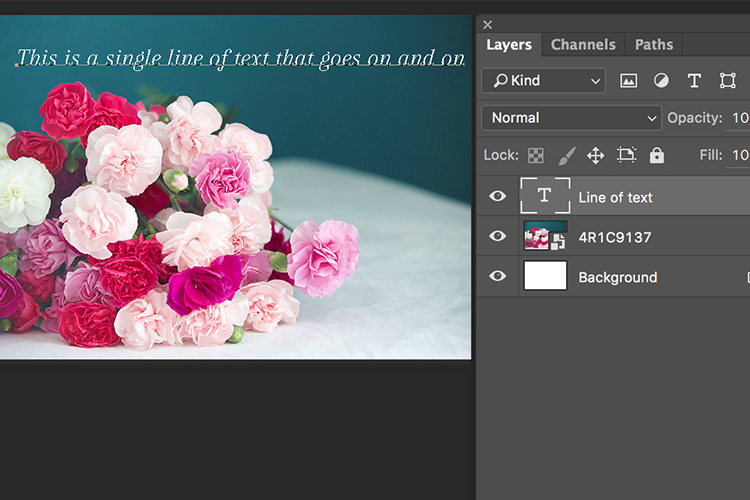
To add text using the Point type, simply click on your image with the Type Tool, in the spot where you want your text to begin. A blinking insertion marker will appear letting you know that Photoshop is ready for you to start typing.
By holding down the Shift key, and dragging the ends of the type box (the blinking insertion marker), and an Area type will be created. This is the area where larger blocks of text, like paragraphs, can be entered. You can also simply click and drag to make a rectangle (similar to make a marquee selection) which will be the Area type.
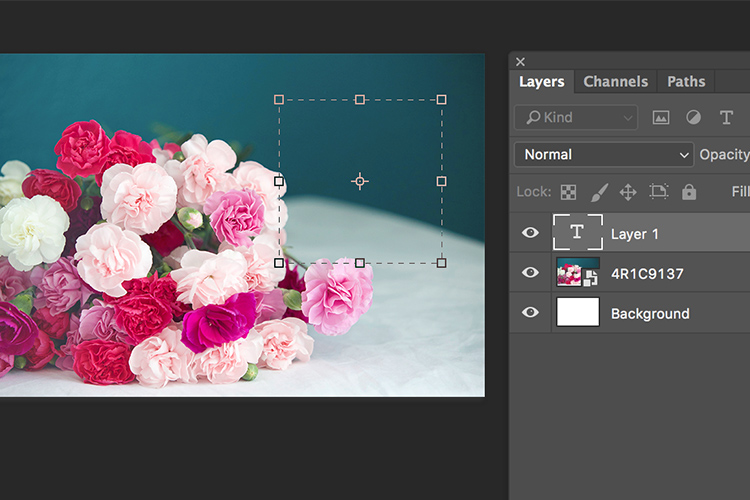
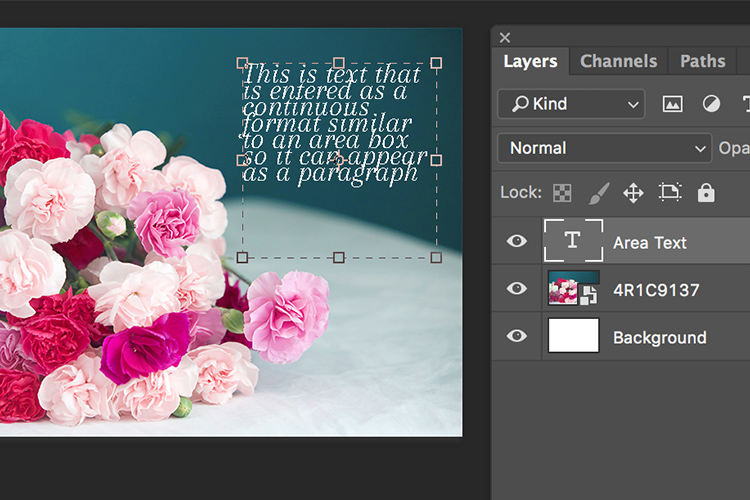
As you can see, the Type tool is a simple yet powerful tool to add text to your images in a creative way. It can be used to enhance the messaging on an image, as well as for other uses like creating announcements, marketing materials, etc., based on your needs. Once you have the basics of the text tool mastered, you can take it up a notch to add effects like drop shadow and an image see-through the text effect as shown in the images below. It is not complicated but you need to follow the steps carefully.
Special text effects

Text tool effect with image see through
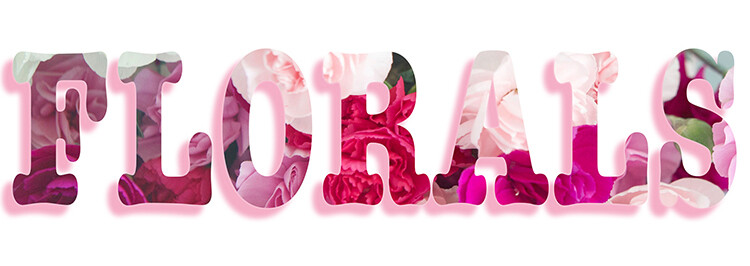
Text tool with image see-through effect and a drop shadow for added impact.
To add a drop-shadow to text, follow the steps listed below:
- Create a new text layer and select the font, size and color you want. To see the true effect of image through text, make sure you select an appropriate font and size (something bold and wide).
- Double clicking on the text layer will open up the layer style panel. To add a drop shadow effect, select the drop shadow option (last option) and adjust the size, position and color of the drop shadow.
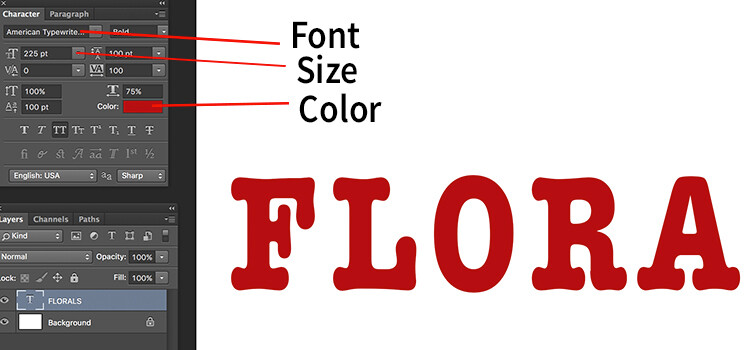
Create a new text layer on a new image and adjust the font, size and color of the text layer to taste. For text see-through effect, a bold large font is preferred.
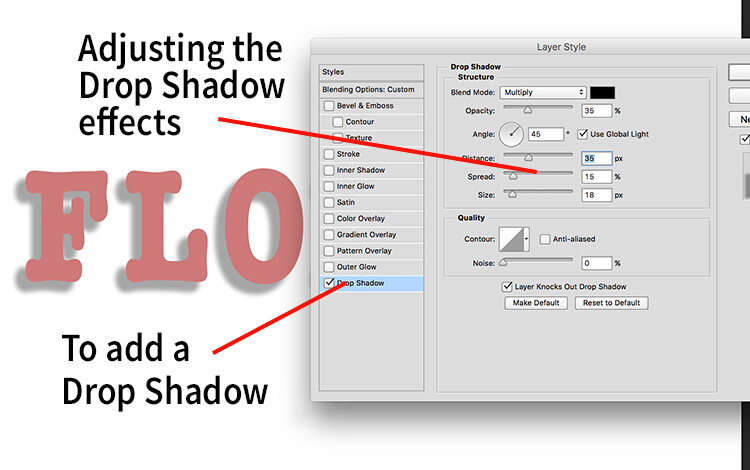
Using the layer style option, you can add a drop shadow effect and adjust the size, distance and orientation/angle of the drop shadow.
Creating see-through text
To create an effect of transparent text (you can see through it) open up the Layer Style panel and click on Blending Options from the left-hand side. Look for Advanced Blending (circled below).
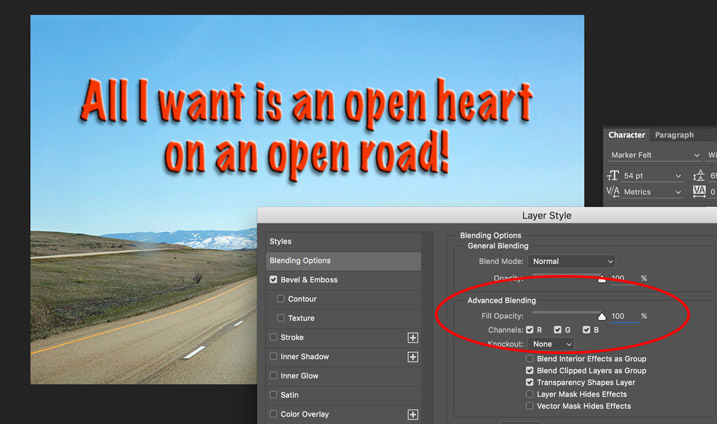
Lower the Fill Opacity by moving the slider to the left. This is what 50% faded looks like:
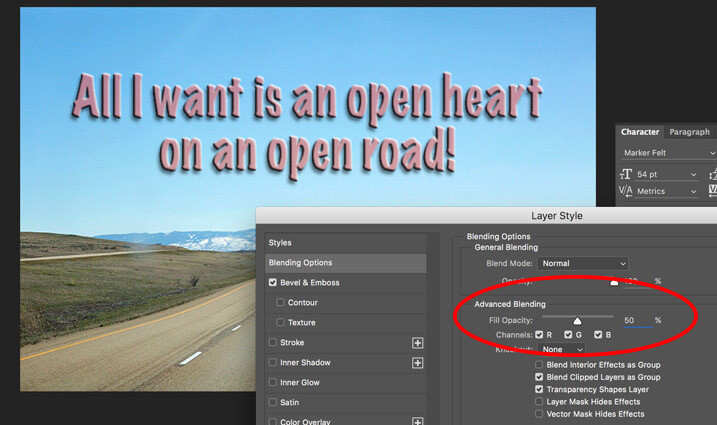
Text layer with the opacity lowered.
Notice that is does not lower the opacity of any of the other layer styles you have applied such as the Drop Shadow. It only fades out the inside of the text. This is a handy trick for making watermarks of your name or logo over your images so it is subtle.
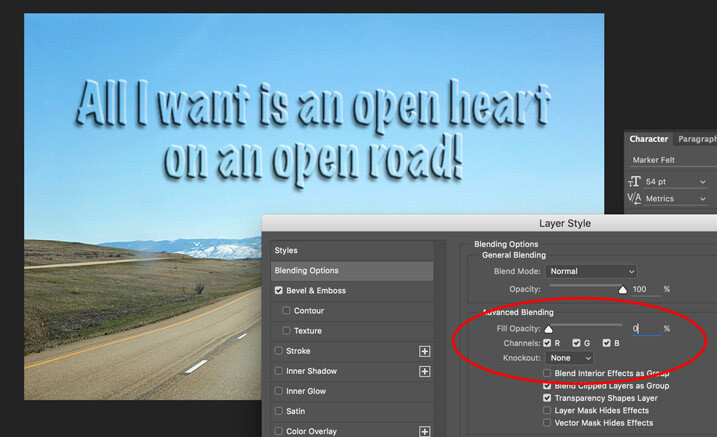
Faded out to 0%
Note: if you want to make a custom color for your text, one that complements well with the tones of your image – you can use the color picker to select a shade right from your image. Just click on the color in the top menu panel or the Character panel if you have it opened – that will bring up the Color Picker popup box. Just hover over your image and you will see a small eyedropper (I have enlarged it below so you can see it easier). Whatever color you click on will be selected and pulled right from your image.
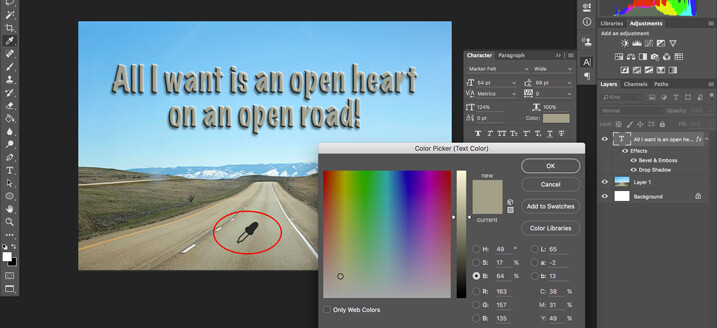
Use the color picker to select a tone from your image to use for your text.
Creating and image inside text
To add an image see-through effect to the text you created, follow the steps listed below:
- Once you have the text you want, place an image (Select File, Place image). A new layer will be created and the image will be placed on top of the text layer. You will notice that the text layer you just created will be hidden behind the image.
- To create the see through effect, you need to add a clipping mask to the image layer. This causes the image to be clipped to the text.
- To add a clipping mask, select Layer -> Create clipping mask from the menu options.
- You can move the image using the transform tool, to change the position of certain elements in the image to line up to the text if needed. For example I moved the image up to show more of the red and pink flowers through the text.
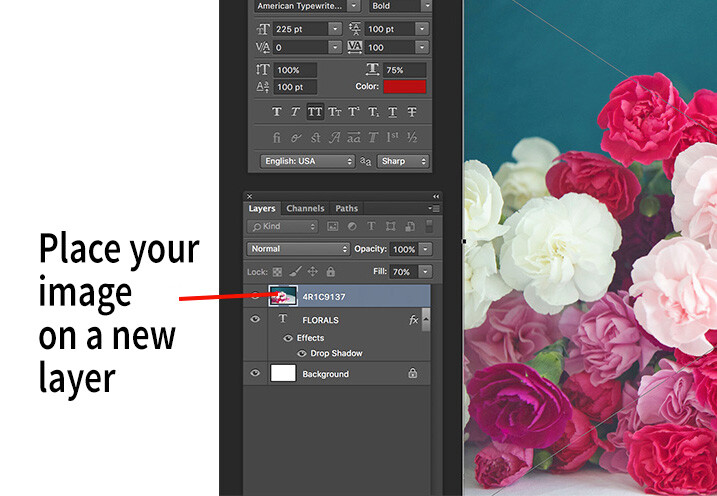
Select the image you want to use for the text see-through effect and use the Place function to put it on the text layer. It is automatically selected in the transform mode. Adjust the size of the image to taste.
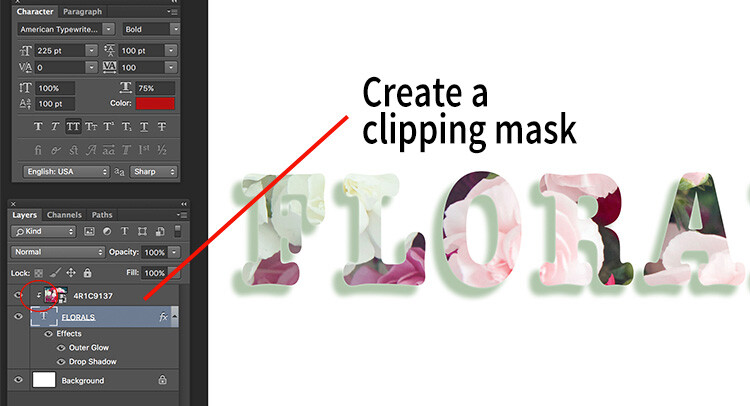
Add a clipping mask to the image layer (Menu option – layer -> create clipping mask). The image will automatically appear behind the text and the effect will be seen through the text. When you see the little down arrow (circled) you know the clipping mask is applied between those two layers.

Text with see-through image effect and pink drop shadow.
Be sure to play around with various images to see what images work for you. What are some way you use the Type tool for your images? Feel free to share in the comments below.
The post How to Use the Text Tool in Photoshop by Karthika Gupta appeared first on Digital Photography School.