For many students, as they start learning photography they want to know how to take photos at night. It is a mystery to them and they often think it is so complicated that they will never be able to do it. That is until they try it and discover just how easy it is. The next step is editing those images and ON1 Photo RAW 2018.5 has a lot of tools and adjustments that are perfect for processing night photography.

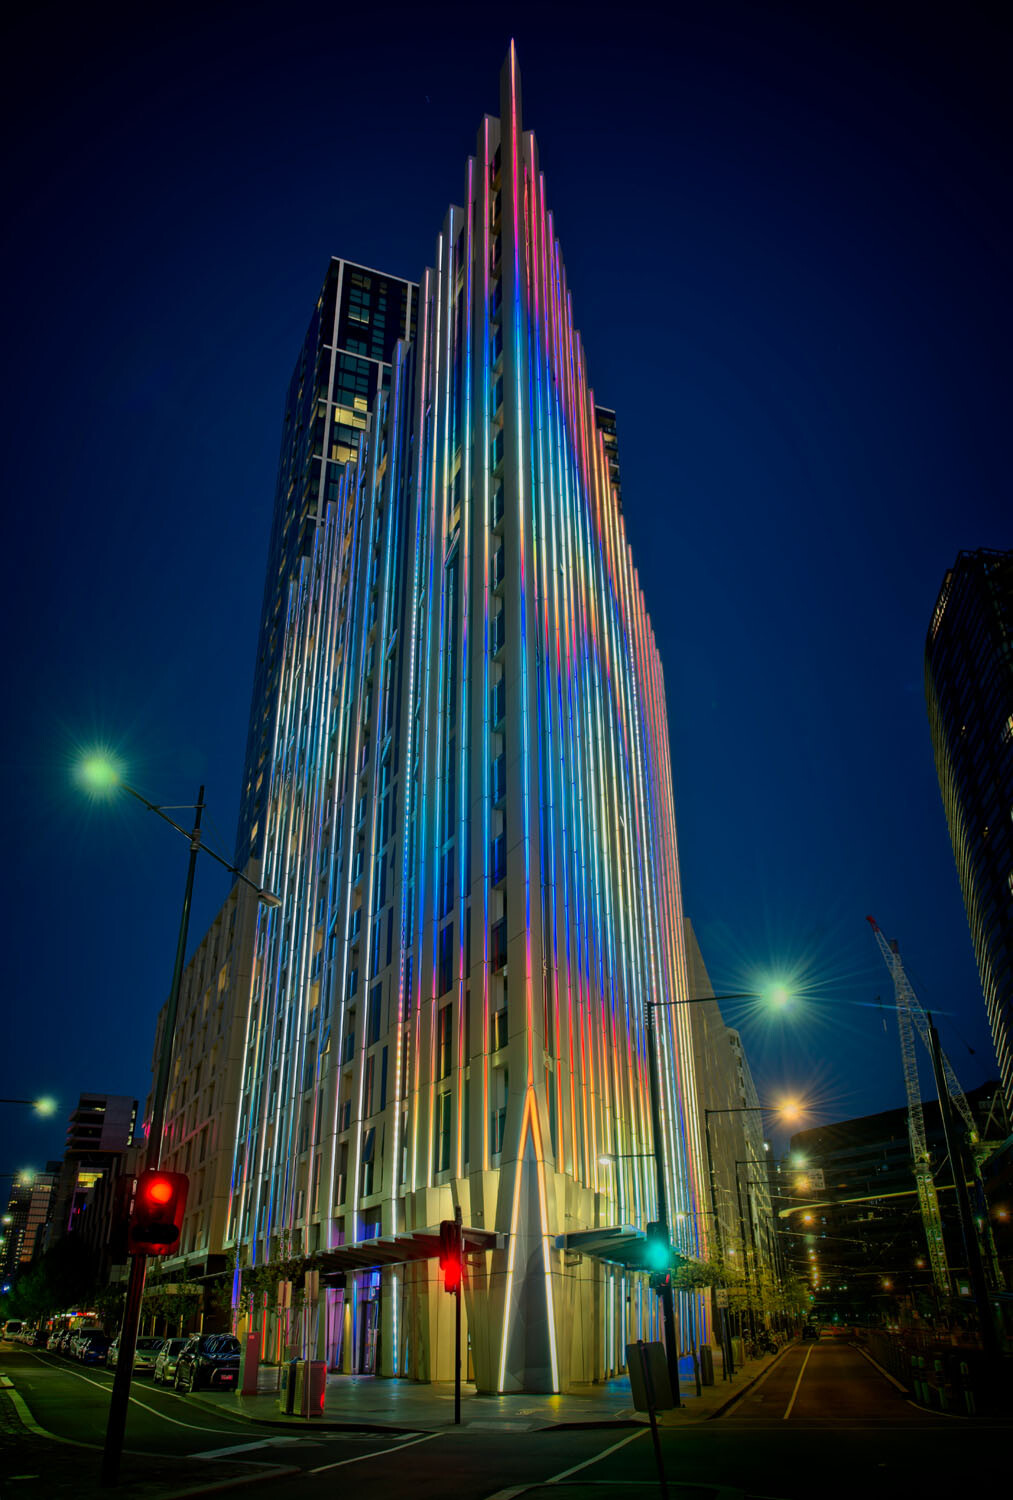
An image created using the HDR option in On1 Photo RAW 2018.
Night photography options
First, we should take a look at the different types of night photography that you can do. There is the easiest option of setting your camera up on a tripod and photographing lights somewhere.
The city at night is very popular if you live in an urban area. Perhaps capturing town lights can also be good. You just need something that is making light. HDR has had a lot of bad press, but it really is good for some images, and night shots of cities are perfect for it. ON1 Photo RAW’s HDR processing is one of the best I’ve seen.
When the sun has gone down and there is a lot of traffic you can photograph light trails. Taking longer exposures with your camera on a tripod will make all those lights look like streaks. If you want to make it look like there were a lot, then you can stack the images together, so all the streaks will show in one final image.
One type of night shot that is hugely popular right now, especially in Australia, is astrophotography. Photographing the Milky Way. It is the season for it here and with the low population, you are spoilt for choice where to do them. If you have ever tried doing any astrophotography then you will also be aware that your images have to be processed or they can look at washed out. ON1 Photo RAW 2018.5 has you covered there as well.

An astrophotography image processed with ON1 Photo RAW 2018.5
Photographing the City
Night time in the city can be so magical and to be taking photos of it even more so. Processing your images taken at night is much the same as processing any of your images.
Open your image in ON1 Photo RAW and take it into the Develop module. Make the adjustments as you would for other images. Move the sliders around to see what you can get. Take them too far and then bring them back.

When learning it is good to take the sliders too far, see what happens.
If you want to make adjustments to particular areas, then look at local adjustments which is the best place to do that.
However, what if you want to do something to your image to really make it pop?
HDR photography, or High Dynamic Range, can be perfect for this. It is a process that has copped a lot of criticism over the years. People say it is too much, that the images can be ugly. But that really only happens when you don’t use it for the right images, or overdo it.
There are some scenes and images that are perfect for HDR and night photography is one of those times.
HDR Night Photography
When you are to decide which images would work best for HDR, look for ones that have a lot of dark areas, and a lot of bright parts as well. Usually, your camera will struggle with getting an even image of a high contrast scene. It will either make the image too bright or too dark. Night images have those problems. Once you get the lights exposed right, all the shadows become too dark or black.
The best way to do HDR is to take a series of images or bracketed shots. If your camera will allow you to bracket then it will sort out the exposures you need. The most common number of shots is 3 or 5. For this article, five images were taken.
Next, select all of your bracketed images inside the ON1 Photo RAW browse module. You can do that by clicking the first then pressing the shift key followed by clicking on the last image. If you have put the images into a subfolder you can then just use Ctrl/Cmd+A.

Work out which images you want to use.
Once they are selected you should be able to see the HDR button over on the right-hand side of your screen, underneath all the different modes.

Select all your images.
ON1 Photo RAW will then merge all your images together. The first time you do it, a window will pop up asking you what look you would like. The options include Natural, Natural Auto, Surreal and Surreal Auto. You can make the changes once the image has been merged to HDR. There are lots of choices with ON1.
Let’s take a look around the HDR working window

Selecting your HDR look in ON1 Photo RAW.
There are several places where you can set the amount of de-ghosting (remove spots where something moved between brackets) you want the program to do. You can change the HDR look you wanted if you think you made a mistake. You can select which image you think should be the main one.
Go through and change the image to suit the look you are after. I know I say this a lot, but the best way to learn is to play around with the settings.

All the different things you can do to your image.
Like most images, you need to experiment to see what you like. Remember that ON1 is non-destructive so you won’t ruin anything. Try everything, it is the best way to learn. Take it all too far and then bring it back.
Lastly, choose where you want your image to go when you are done. You can have it open in Develop, Effects or go back to Browse. The last choice is Cancel. If you want to save it then click Save.

Taking the image further.
Once the image is opened in the Develop module, you can then make more adjustments to as you would normally.

Where to go next.
ON1 Photo RAW is one of the best programs for doing HDR. You can make so many changes to it as it is happening and after it is done. Nothing is final.

The final HDR image.
Astrophotography
For anyone who has ever done astrophotography, you know that the images always need to be processed.
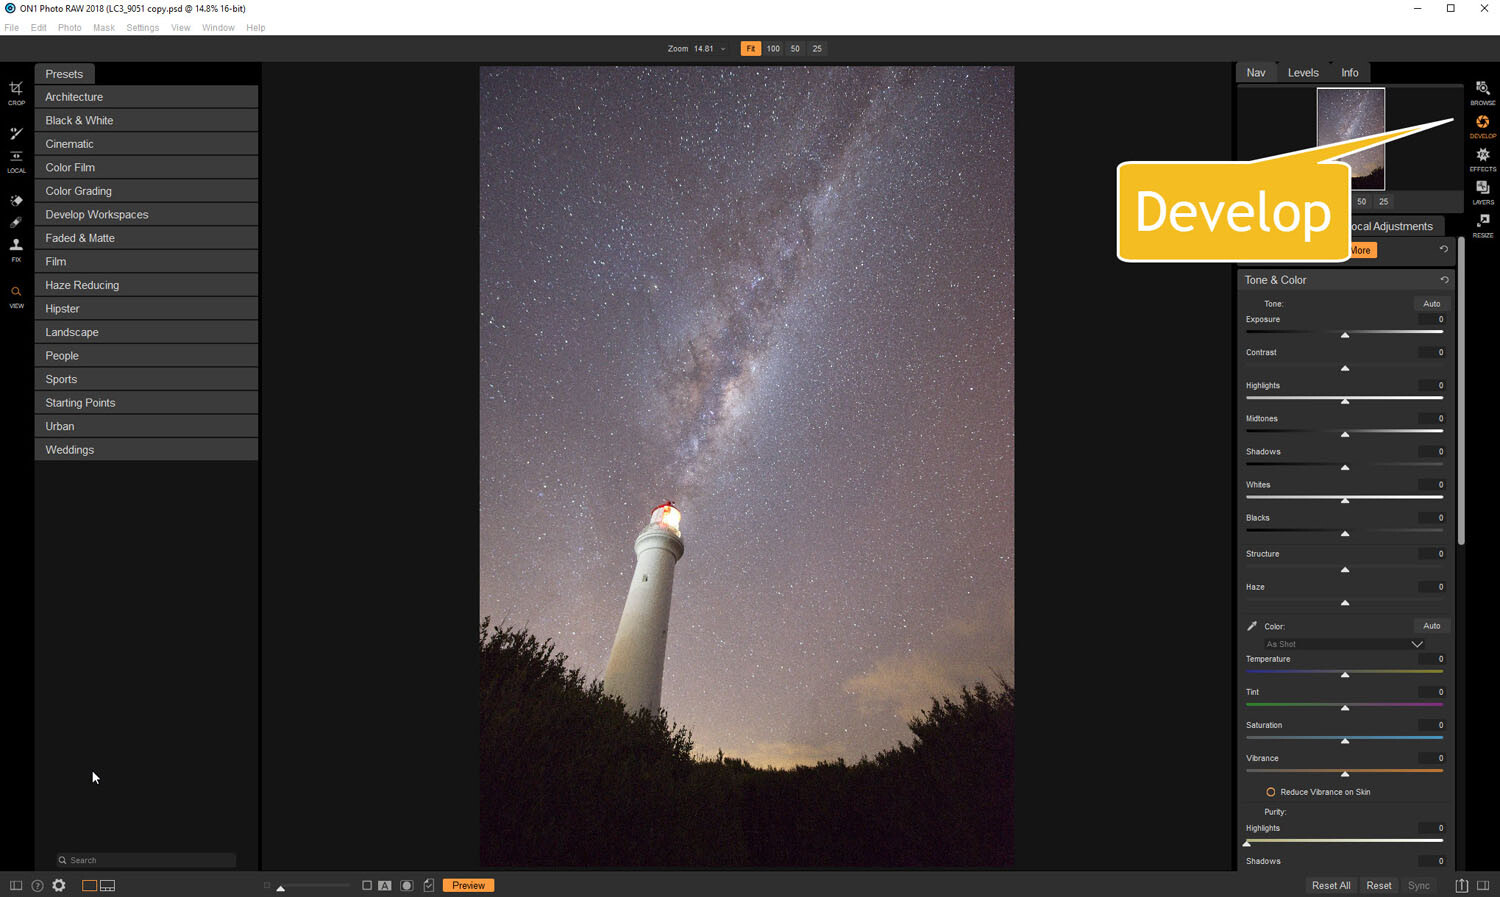
Here is an image that was taken a couple of years ago. This is the raw file and you can see that it needs a lot of work.

Raw image from astrophotography shoot.
Open the image up in ON1 Photo RAW and go to the Develop module. Everything you need to make the best astrophotography images is all right there.

Open in the Develop module.
Noise reduction
The first thing you want to do is to work on the noise in the image. All astrophotography images have a great deal of noise. You have to increase your ISO quite high in order to get the Milky Way in your image. Usually, it is going to be somewhere between ISO 3200 up to 6400.
The image for this article was taken at f/2.8, for 30 seconds at ISO 6400. It was taken at 14mm using a 14-24mm lens.
In the Develop module go to Details. This is where you can help reduce the noise in your image. Click on the image to zoom in so you can see the noise better.

The first thing to do is to fix the noise in the image.
Under Noise Reduction, you will see a Luminance slider. Move that along until the noise almost disappears. Be careful not to go too far or you might lose all the stars (noise is just white specs so the stars can easily be misinterpreted as noise if you go too far).
This slider smooths out the image and you can lose a lot of detail if you go too far. Bring up the Detail slider to help maintain it. It is about experimenting and seeing what you like as well.
You can also bring up the Sharpening amount as well but be careful. Over sharpened images can look terrible. Go easy with this slider.

You can see how much was changed.
Tone & Color
It is time to go back to Tone & Color and make more adjustments.

Take the image back to Tone & Color to make basic changes.
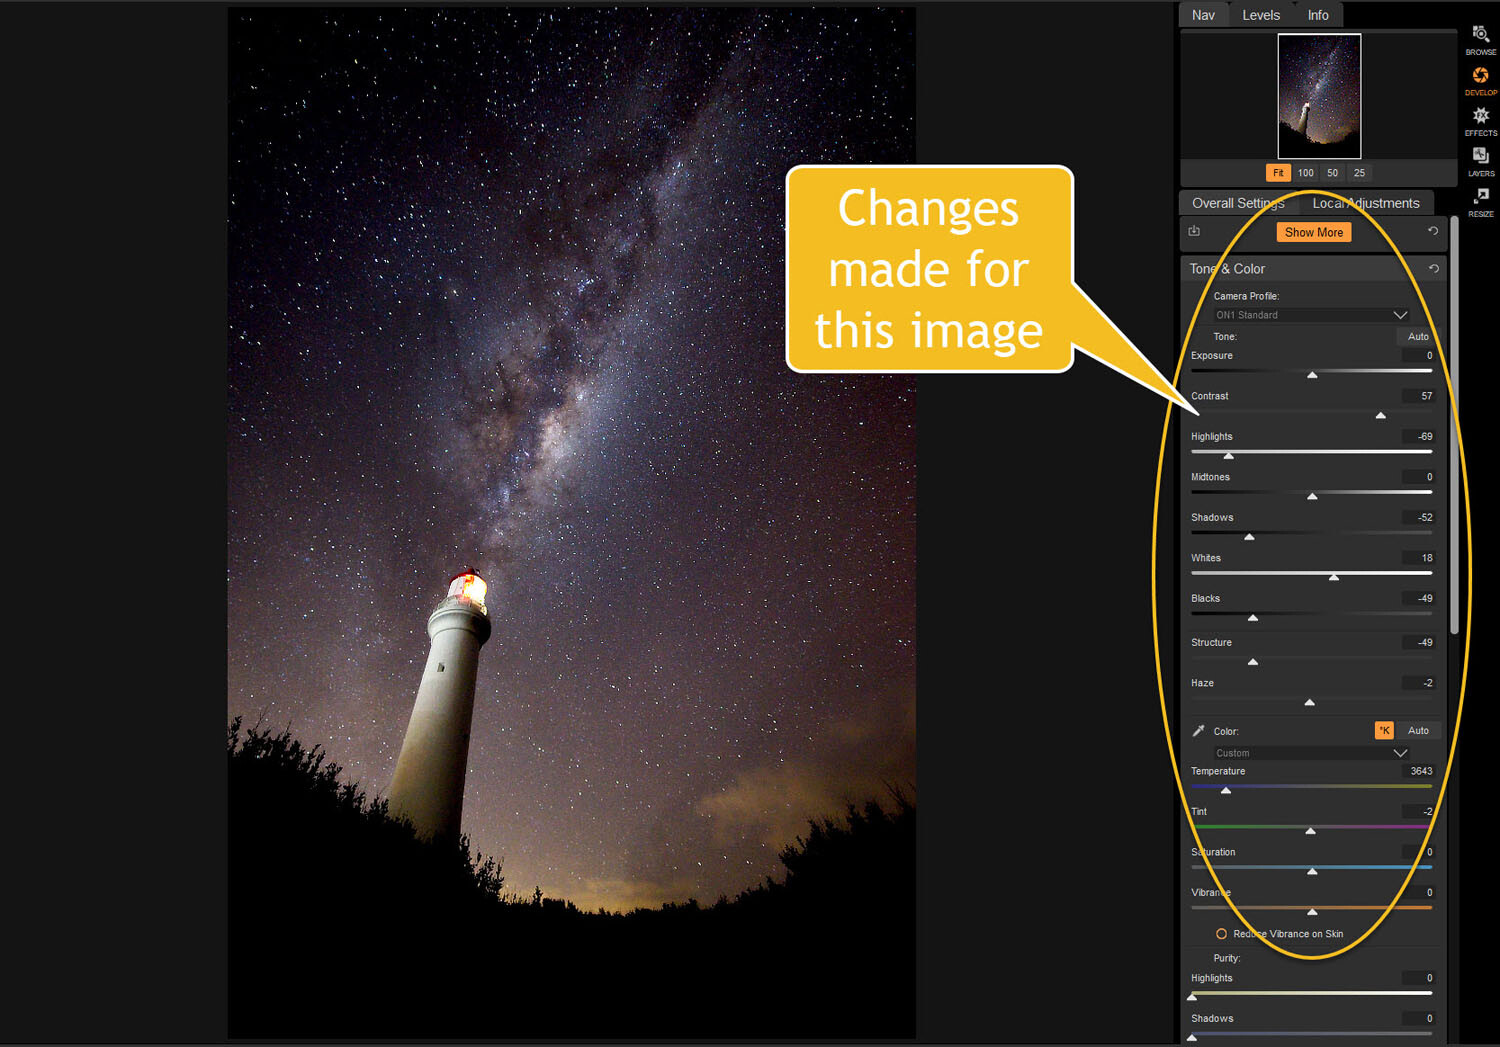
The main things you want to add back into your image are the blacks and lots of contrast. The added contrast will help the stars stand out more from the dark sky. The blacks will allow the darker parts of the sky to appear as you saw them when you shot the image.
The highlights can be brought down to stop the lighthouse from blowing out too much. If you take the shadows down it helps make the darker parts of the sky richer as well. However, be aware that it can also make other parts of the image go black, like the foliage at the bottom of this image.
The whites were brought up a fraction, as this helped to lighten up the Milky Way and make it jump out more.

Some of the changes that were made in Tone and Color.
Color Adjustments
Most of the changes are made to the image now, but if you look closely there is quite a bit of blue in it. It shouldn’t be there and to remove it you need to go to Show More and then Color Adjustments.

Taking out the blue cast color in the stars.
A new window for this will open up down below the other adjustment windows.
As it is the blue you want to change, click on that color square. Once it is selected you can move the saturation slider until the blue in the image disappears or is to your liking.

Changing the saturation of the blue.
You can try adding presets to your image as well, though most people with astrophotography just do the basics and leave it there.
You will need to play around with your photos to see what you can do and what is to your tastes. These are just suggestions as to what other photographers do. Experiment, take the sliders too far and then bring them back.
This is the final image.

The final image of the Milky Way over the top of the lighthouse.
Light Trails
In cities, or anywhere there is a lot of traffic, you will see photographers trying to capture the trails of the lights as the cars go past. For most places, the best time to capture this is during peak hour when a lot of vehicles are moving. However, it also needs to be dark.
Unfortunately, there are times of the year where it is impossible to get both at the same time. For instance, in Australia during the summer daylight saving means it doesn’t get dark until after 8 pm. Getting good light trails is reduced because there isn’t enough traffic at that hour.
However, there is a way to make it look like there was more traffic, that is to stack your images. You can also do this for star trails too.
Stacking light trails
Work out which image will be the first one. Take it the Develop module in ON1 Photo RAW and do what you want to process it normally first.
But do not straighten it or do any lens correction on the image. If you do then the other images won’t align up properly, you can do all that after.

The first image used for the light trails.
Once you have your image ready, go to the Layers module.

Take the image to the Layers mode.
Next, add all the other photos that will make up the final image. The best way to do this is to put all the images into a subfolder. Select the images you want to use, then right-click and go to Add Subfolder.

Putting your images into a subfolder.
A window will pop up once you click Add Subfolder. You can name it as you want, or ON1 will name the folder the same as the filename for the first image. Make sure the box is ticked for Move Selected Items into Subfolder.

Creating the subfolder.
Now you are ready to add all those images as layers to the original photo.
Get your image to the Layers module which is where you will add the images for your light trails. Go up to File in the main menu at the top. Select Add Layer(s) from File.

Now it is time to add the layers.
A window will pop up where you can go to the subfolder that you put the images into. Select all the images, Ctrl/Cmd+A, then press Open.

Selecting all the images you want to use.
ON1 Photo RAW will ask you if you want to open them all, say yes. Depending on how many images you are trying to do it can take some time for this to happen. The images used for this demonstration are quite large and took a few minutes.

All the images are added.
Next, you need to blend each layer. You want the lights to shine through from each but not everything else. For each layer, go up to the blending pull-down and select Lighten.

Blending all the layers with Lighten.
You can now save the image and then you can do more processing if you wish. If the image needs straightening, lens corrections, etc., you can do it in the Develop module.

The final image.
Star Trails
If you enjoy doing star trails then you will be able to use this same method for processing and stacking those images using ON1 Photo RAW. Just add them all as layers and use the Blending option Lighten.
Conclusion
There are many things you can do with your night photos in ON1 Photo RAW 2018.5. With things developing constantly you will be able to do more and more with time. The HDR feature is one of the best I’ve seen and I’m sure most of you will enjoy that.
With all software, experimenting is the key. Take what you learn and see what else you can do with it.
Disclaimer: ON1 is a dPS paid partner.
The post Tips for Processing Night Photography with ON1 Photo RAW 2018.5 appeared first on Digital Photography School.